It’s that time of year again. You wake up in Draper to a 43-degree morning, throw on a hoodie, and head to work. By 3 PM it’s 81 degrees, your house is stuffy, and you’re staring at the thermostat thinking — when’s the last time I even ran the AC? September?
Welcome to spring 2026 on the Wasatch Front. If your air conditioner has been sitting idle since last fall, you need a solid spring AC startup checklist before the first heat wave hits. Improper maintenance can increase your energy use by 30% or more according to NIST, and emergency repairs cost 50–100% more than a planned service call. Not great math.
Good news: you can knock out this spring AC startup checklist in about an hour, with stuff you already have at home. Eight steps. No special tools. And by the end, you’ll know your system is ready before Utah’s heat really shows up — and before cottonwood fluff season turns your condenser into a cotton ball. If you’re still weighing whether central air is the right cooling choice for Utah’s climate, our swamp cooler vs. central AC comparison breaks down how both systems handle Utah’s dry summers.
Rather skip the DIY route? Give us a call at (801) 997-8909 — our $69 spring tune-up covers all of this and more.
Step 1: Flip the Breaker On 24 Hours Early
This is the step almost nobody talks about — and it’s the most important item on any spring AC startup checklist. Before you turn on AC in spring, your compressor needs a head start.
Your AC compressor has a crankcase heater — a small heating element that keeps the refrigerant oil warm and fluid. When the breaker’s been off all winter, that oil settles and thickens. If you fire up the compressor with cold, sluggish oil, you risk serious damage. We’re talking a compressor replacement that can run over a thousand dollars.
So here’s what you do: find the breaker for your AC. It’s usually a 240-volt double breaker in your main panel labeled “AC,” “Air Conditioner,” or “Compressor.” Some homes also have a disconnect box mounted on the exterior wall near the outdoor unit. Flip it on and walk away.
Give it a full 24 hours before you actually run the system. The crankcase heater needs that time to warm the oil back up. If you need help locating your breaker or aren’t sure about the reset process, we’ve got a walkthrough on how to reset an air conditioning unit safely.
That’s it. Easiest step on the list — and the one that could save you the most money.
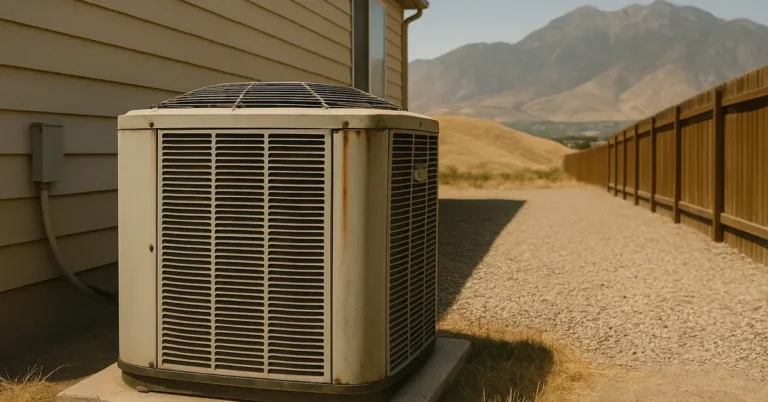
Step 2: Clear Debris and Clean the Outdoor Condenser
Your condenser has been sitting outside since September. Through wind, snow, dust storms, and whatever your neighbor’s tree dropped over the fence. Time to give it some attention.
First — if you put a cover on it for winter, take it off now. And please, never run the AC with the cover still on. We’ve seen it happen. The unit overheats fast.
Clear away any leaves, sticks, trash, or dead plants within two feet on all sides. Your condenser needs airflow to dump heat, and anything blocking the coils makes the whole system work harder.
Now grab a garden hose — not a pressure washer — and gently spray the coils from the inside out. You’ll be surprised how much dust and grime comes off, especially here in Utah. After a Utah winter, your outdoor AC unit needs more than a quick rinse — check out our detailed guide on how to clean your AC condenser unit to restore efficiency and prevent costly damage.
If you live along the I-15 corridor south of Provo or out near the Point of the Mountain, red construction dust coats everything over winter. West of the valley near the lake, spring dust storms add another layer. Cleaning those coils can improve airflow by 10–46% — even the low end makes a difference on your energy bill.
If you notice any bent fins on the coil, a fin comb from the hardware store will straighten them out. Takes five minutes.

Step 3: Replace the Air Filter (Yes, Even If You Changed It in Winter)
We know what you’re thinking — I just changed it in February. Doesn’t matter. Spring is a fresh start for your HVAC system, and you want a clean filter going into cooling season. Especially in Utah.
Here’s why. April and May bring pollen season in full force.
If you live near orchards in Utah County or Davis County, your filter is already catching more than you’d expect. And then mid-May through June, the cottonwood trees along the Jordan River corridor and around Liberty Park start dropping fluff. That stuff clogs filters, screens, and condenser coils like nothing else.
For most homes, a MERV 8 to MERV 11 filter is the sweet spot. Higher MERV ratings catch more particles, but they also restrict airflow — and if your system wasn’t designed for a MERV 13 or higher, you’re doing more harm than good. If spring allergies are a concern, our guide on how your HVAC filter affects spring allergy symptoms breaks down which MERV rating actually helps with Utah pollen. And because Utah’s unique dust and pollen load changes filter needs throughout the year, check out our complete guide on how often to change your AC filter during Utah’s dusty summer for month-by-month recommendations. Check the edge of your current filter for the size, or look it up in your owner’s manual.
Heating and cooling already makes up about 42% of your energy bill according to ENERGY STAR. A clogged filter makes that number climb even higher.
Step 4: Open All Vents and Check Your Ductwork
Walk through every room in your house. Open every supply and return vent. Check behind couches, under curtains, under rugs — it’s amazing how many vents get blocked during winter when you’re rearranging furniture or piling up blankets.
While you’re at it, vacuum the dust off the vent covers. That first blast of air from the AC doesn’t need to launch six months of dust into the room.
If you have accessible ductwork in your attic or basement, take a quick look. You’re checking for obvious gaps, disconnected joints, or sections that look crushed or damaged. Leaky ducts waste a surprising amount of energy and create those hot spots where one room is freezing and the bedroom down the hall is 78 degrees. For a detailed look at what a professional ductwork inspection includes and how it can improve efficiency, see our spring ductwork inspection guide. For more on keeping your whole system in shape year-round, take a look at our HVAC maintenance tips for homeowners.
One tip: if you have rooms you rarely use, you can close the vents partway to redirect airflow. But don’t close them all the way — that creates back pressure on the system. This kind of AC maintenance spring cleaning makes a real difference once summer hits.
Step 5: Inspect the Refrigerant Lines and Insulation
Two copper lines run from your outdoor condenser to the indoor unit. The larger one — the suction line — should be wrapped in foam insulation. That insulation matters more than you’d think.
Walk along those lines and look for cracks, gaps, or spots where the foam has deteriorated. Utah’s freeze-thaw cycles are brutal on foam insulation. We see it break down faster here than in moderate climates. One winter of freezing and thawing, and that insulation crumbles like old styrofoam.
While you’re looking, check for signs of a refrigerant leak: oily stains on the connections, frost or ice forming on the lines, or any hissing sounds when the system kicks on. These are all things you’d want to know about before summer hits — especially if your system is approaching the typical AC lifespan in Utah. For a deeper look at warning signs, check out our guide on common signs your AC needs repair or replacement.
If the insulation is just worn out, foam pipe sleeves from Home Depot or Lowe’s are an easy fix. But if you’re seeing oily stains or ice? That’s a refrigerant issue, and that’s a call-a-pro situation. Our guide on 5 signs your AC is low on refrigerant explains exactly what to watch for and what to do next.
If the insulation is just worn out, foam pipe sleeves from Home Depot or Lowe’s are an easy fix. But if you’re seeing oily stains or ice? That’s a refrigerant issue, and that’s a call-a-pro situation. Our guide on 5 signs your AC is low on refrigerant explains exactly what to watch for and what to do next. And don’t dismiss refrigerant leaks as just a minor cooling issue — at Utah’s altitude and summer heat, they cascade into serious problems fast. For the full story, see our guide on why a refrigerant leak is more than just a cooling problem.
Spot something that doesn’t look right? Don’t guess — call us at (801) 997-8909. We’ll send a Utah state licensed tech to check it out.
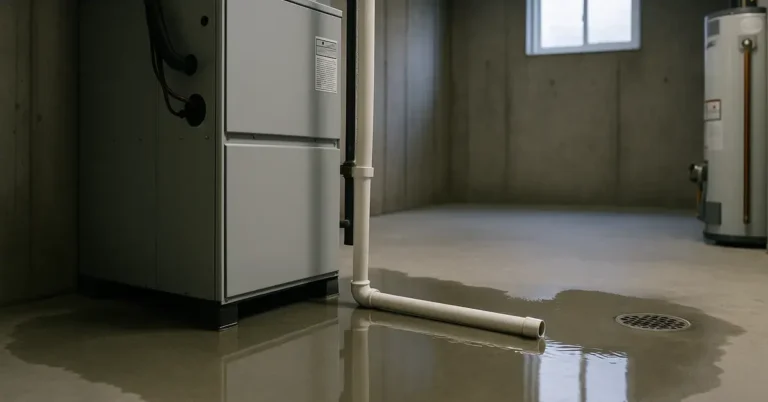
Step 6: Clear the Condensate Drain Line
This one takes five minutes and can save you from a real mess.
Your AC creates condensation when it runs — water pulled out of the air as part of the cooling process. That water drains through a PVC line, usually near the indoor air handler. Over time, algae, dust, and gunk build up inside that line. Even in Utah’s dry climate, debris accumulates over the winter months.
Pour a cup of distilled white vinegar down the drain opening. Some people use a diluted bleach solution, and that works too. Either one will clear out the buildup and keep things flowing.
Here’s why it matters: if that line clogs, water backs up. In a best-case scenario, the safety float switch trips and shuts your system down. In a worst-case scenario, you get water damage — and nobody wants to discover a puddle under the air handler on the first 90-degree day in June. Here’s the full story on how a clogged AC condensate drain line floods Utah basements.
While you’re there, check the drain pan underneath the air handler for standing water or rust. If there’s water sitting in it, the line is already partially blocked.
Step 7: Switch Your Thermostat to Cooling Mode
Sounds obvious, right? You’d be surprised how many “my AC isn’t working” calls we get in spring that come down to the thermostat still being set to “Heat.” It happens. No judgment.
Switch from Heat to Cool. Done. Just make sure to wait 5 minutes between turning off heat and switching to cooling mode — this allows refrigerant pressure to equalize and prevents compressor damage. For the complete step-by-step process on safely making the seasonal transition, check out our guide on how to switch from heat to AC. But while you’re at the thermostat, there are a couple more things worth checking.
If you’ve got a smart thermostat, update your schedule for spring and summer. This is especially important along the Wasatch Front, where a typical April or May day can swing 25 degrees between morning and afternoon. You might still want heat running at 6 AM and cooling by 2 PM. “Auto” mode is your friend during the shoulder season — it lets the system switch between heating and cooling as needed without you babysitting it. For a month-by-month breakdown of what temperatures to set, check out our guide on the best spring thermostat settings for Utah.
The Department of Energy recommends 78°F when you’re home and higher when you’re away. But honestly, find what’s comfortable for your family. Setting it to 72 all day isn’t a crime — it’s just more expensive.
One more thing: make sure your fan is set to “Auto,” not “On.” The “On” setting runs the blower continuously, even when the system isn’t actively cooling. That drives up your energy costs and can make your house feel clammy.

Step 8: Fire It Up and Listen
This is the moment of truth — the last stop on your spring AC startup checklist. Of all the air conditioner startup tips out there, this one is the most telling. You’ve done the prep work. Now it’s time to see what happens.
Set your thermostat about 5 degrees below the current room temperature. That’s enough to trigger the cooling cycle. Now pay attention.
Here’s what a normal startup sounds like: a click from the thermostat, the indoor blower spinning up, and then — within a minute or two — the outdoor compressor kicking on with a steady hum. That sequence is good. That’s what you want to hear.
Here’s what’s not normal: grinding. Squealing. A metallic banging. Rapid clicking that won’t stop. Our guide on 6 weird AC noises and what they mean explains exactly which sounds are urgent and which can wait for a scheduled service call. If you hear any of those, shut the system down and call a technician. Pushing through those sounds turns a small repair into a big one.
Let the system run for about 15 minutes. Walk through the house and hold your hand up to each vent. The air should feel noticeably cooler than the room. If certain rooms have weak or no airflow, you’ve probably got a ductwork issue — a disconnected run or a damper that got closed.
You’ll probably notice a dusty smell for the first few minutes. Totally normal — that’s months of settled dust burning off the coils, and it should fade within 15–20 minutes. But if you smell something chemical or like burning plastic, shut the system off immediately and call a professional.
If the system runs but only blows warm air, don’t panic. Check the thermostat settings again, give it 30 minutes, and if it still isn’t cooling, check out our FAQ below or read up on common AC warning signs.
Spring AC Startup Checklist FAQ
When should I turn on my AC in the spring?
In Utah, most homeowners first need cooling sometime in late April or May. A good rule of thumb: once daytime temps start consistently hitting the mid-70s, run through this spring AC startup checklist and flip the switch. Don’t wait until June — by then, every HVAC company in the valley is booked solid.
How long should I let my AC run the first time?
Let it run for at least 15–20 minutes on the first startup. This gives you time to check airflow from each vent, listen for unusual sounds, and confirm the air coming out is actually cold. If everything looks and sounds good, you’re set.
Should I turn on the breaker before starting AC?
Yes — and ideally 24 hours before. The crankcase heater in your compressor needs time to warm the refrigerant oil that settled and thickened over winter. Skipping this step is one of the most common causes of compressor damage on spring startup.
Why is my AC blowing warm air after sitting all winter?
A few common reasons: the thermostat is still set to Heat mode, the air filter is clogged, or the system has a refrigerant leak. Start with the basics — check your thermostat setting and your filter. If those are fine, it might be a refrigerant issue, which requires a licensed technician. You can also try resetting your air conditioning unit before calling for service.
What does a spring AC tune-up include?
A professional tune-up covers everything on this checklist and more. We check refrigerant levels, test electrical connections, clean the evaporator and condenser coils, inspect the blower motor, verify thermostat calibration, and check the condensate drain. For a detailed walkthrough of what happens during the appointment, read our guide on what to expect during an AC tune-up in Utah. It’s a full system health check — designed to catch small problems before they turn into expensive ones.
“An hour of spring maintenance now is worth a lot more than a weekend without AC in July.”
While you’re knocking out spring home maintenance tasks, don’t forget your basement. If you have a sump pump, now’s the time to make sure it’s ready for Utah’s spring snowmelt and rainstorms. A failed sump pump during spring runoff can mean thousands in flood damage. Check out our guide on sump pump spring maintenance to protect your basement before the heavy rains hit. And while you’re thinking about spring home prep, run through our comprehensive spring plumbing inspection checklist to catch outdoor faucet freeze damage, water heater sediment buildup, and hidden leaks before they become expensive problems.
Look — spending an hour on this spring AC startup checklist isn’t glamorous. But it’s the difference between a system that runs smoothly all summer and one that quits on the first triple-digit day. The Department of Energy estimates that proper maintenance delivers 5–20% in annual energy savings. Your wallet notices that.
If anything on this list looked off — or if you’d rather have a pro handle the whole thing — our $69 spring AC tune-up covers all eight steps and then some. We’re a family-owned company with 20+ years of experience serving the Wasatch Front, and every tech we send is Utah state licensed.
Give us a call at (801) 997-8909 to schedule your spring tune-up. Or ask about our Home Health Plan for year-round coverage that includes annual tune-ups, priority scheduling, and discounts on repairs. We’re available 24/7 — and the $49 dispatch fee is waived if you go ahead with the repair. We serve communities across the Wasatch Front and beyond.
Homeowners in Salt Lake City can learn more about our Salt Lake City AC repair services.
Ninja HVAC also serves Hideout and surrounding communities.
Ninja HVAC also serves Woodland Hills and surrounding communities.